Vertical waterproofing of foundations. Treatment of the foundation for protection against ground and melt water
Any type of waterproofing material is designed for use in certain conditions. Waterproofing designed for coating the foundation is no exception. This is a special coating – a special multi-layer coating. Often everyone uses the Technonikol brand for coating.
Depending on the purpose, it can have a different thickness, the indicators of which vary from a millimeter to several tens of millimeters. It depends on the purpose of the material, on the conditions of use in which it will show its waterproofing qualities.
Coating insulation can be used for internal and external protection of premises and buildings.
All of them differ in service life, technical characteristics, application methods, composition and features of the device.
Each specific species is used in the appropriate climatic conditions. However, it can be responsibly stated that durable and relatively inexpensive coating waterproofings are always in high demand.
What is this material? Usually these are plastic liquid compositions designed to reliably protect brick and surfaces.
After hardening, the applied agent forms a strong, seamless film with good resistance to mechanical stress, protecting it from moisture and ultraviolet radiation.
Coating waterproofing must meet the following requirements: 
- Guaranteed absolute moisture resistance;
- Durability, resistance to UV radiation, moisture and aggressive;
- High elasticity, which prevents the material from cracking in case of shrinkage of some fragments, as well as under the influence of harmful climatic conditions.
Materials and types of coating waterproofing
All the variety of materials of this type can be conditionally
can be divided into the following groups:
- Polymer cement;
- polymeric rubber.
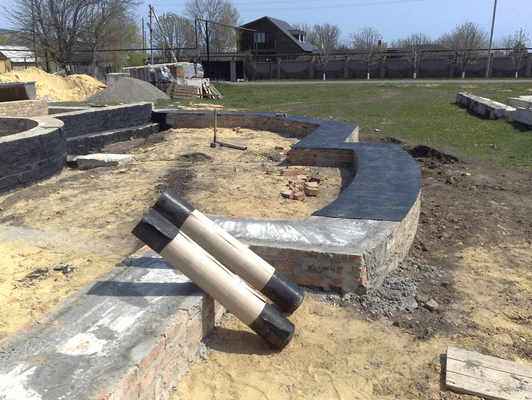
Bituminous mastic was originally used as one of the types of rolled roofing material. Its fundamental difference lies in the fact that it does not need to be warmed up, and therefore it can be used at any time of the year, including cold weather.
bituminous And polymeric cover previously cleaned surfaces: the plastic agent evenly fills all the pores and cracks of the surface.
Coating foundation protects it from the harmful effects of groundwater, as well as from waters with a deep horizon. Mastics will be optimally effective when the depth of occurrence is approximately 2 meters below the base.
Coating waterproofing technology
 The application technology and recommendations of manufacturers suggest covering with 2-4 layers of the agent, at least.
The exact number of layers depends on how deep the foundation is.
The depth of the foundation correlates with the thickness of the waterproofing layer as follows:
- Depth more than 5 meters or concrete piles - thickness from 5 mm;
- Depth from 3 to 5 meters - respectively 2-4 mm;
- Depth up to 3 meters - 2 mm thickness.
The technology of applying the material must be carefully observed in accordance with the manufacturer's recommendations.
 waterproofing layers are applied independently of each other, before applying the next, the previous one must dry well. If the next layer is applied to a damp surface, then after a while it can peel off, then air and moisture get inside, which act destructively.
How can you tell if the waterproofing layer is dry enough? This is easy to do, it will be enough to run the palm of your hand over the surface. If it sticks, sticks to the skin, then it has not dried out yet.
The dried mastic is soft and elastic to the touch. The drying speed of each individual layer depends on the manufacturer of the material, its composition, the humidity of the treated surface and the ambient temperature.
Work procedure
We note an important condition. Before you start applying waterproofing material, you need to properly prepare the base. Only in this case, the working qualities of the waterproofing layer will work in full.

The quality of adhesion of the base surface and the applied mastic depends on such an indicator as humidity. Even low levels of humidity can cause deformation of the surface of the protective layer.
 The connection of the base and mastic is broken, it does not hold well, and can peel off and even fall off over time. What is the maximum humidity limit?
For polymer-bitumen and bitumen insulation, they should not exceed 4 percent, and for water-based insulation they are slightly higher - 8 percent.
It is strictly forbidden to cover a wet surface with coating mastic.
How do you know if the base has dried enough and can you start working on it? There is a very simple way: about a square meter of base area, a polyethylene film spreads. If no condensation appears from inside it within a day, you can get to work.
What is a primer? Application rules
- This is a special type of bitumen, which includes various mineral components. They help to improve the adhesion of the mastic to the base from, providing the material with optimal adhesion.
 For each type of foundation, the primaries are selected individually. Priming compositions for rubble and brick structures have the highest cost.
For the manufacture of the primer, bitumen of the BNK 90/30 or BN 70/30 grade is used, nefras or gasoline is taken as a solvent. The heat resistance of this mixture does not exceed 80 degrees.
For each type of mastic, the primer is selected individually.: it is applied evenly over the entire surface in one layer. In the case when there are joints of horizontal and vertical concrete slabs in the foundation, it is worth applying two layers.
The composition is applied with a brush or roller, then wait for its final drying.
Coating mastic applied as follows:

After the final solidification of the previous layer, you can proceed to the next one.
Reinforcement of coating waterproofing
It will last a much longer period if you take care of its reinforcement in advance.
Reinforcement is placed at junctions where sections of the foundation are usually subjected to increased pressure.
 What can serve as reinforcement? In this capacity, fiberglass or fiberglass is usually used, characterized by a small outer diameter and remarkable flexibility. It is allowed to use roll materials.
The density of the resulting mesh-reinforcement should be between 100 and 150 grams per square meter.
How is it happening? Fiberglass is slightly embedded in the initial layer of mastic, pressed with help, then fixed with plastic staples. In this case, the adhesion of the reinforced waterproofing to the foundation will be optimal.
Transverse reinforcement is preferable, which thickens the useful waterproofing layer. If there is not enough space for applying mastic, the joints should be deepened. The primer is used to treat the inner surface.
One of the stages in the construction of the foundation is to ensure good waterproofing. After all, it is the foundation, as the basis of the building, that has close, constant contact with the ground. Rain, snow, groundwater have a negative impact on the foundation of the house, destroying and eroding it. The situation becomes especially dangerous in severe frost: water penetrating into the pores and microcracks of the foundation freezes, thereby expanding them and accelerating the destructive process.
The solution to the problem will be the conduct of high-quality waterproofing of the foundation. Having carefully read the sequence of work, it is enough just to waterproof the foundation with your own hands.
Foundation waterproofing technology
In order for the work to be carried out qualitatively, it is necessary to determine in advance the sequence of processes and comply with some necessary requirements:
- determine the level of groundwater;
- calculate the force of swelling of the soil;
- determine the composition of the soil;
- determine the living conditions in the house.
With a maximum groundwater level of one meter below the base of the foundation, it is sufficient to carry out vertical and horizontal waterproofing.

When the groundwater level is above one meter from the base of the foundation, high-quality protection against moisture is provided by a wider range of measures. Horizontal waterproofing is done in two layers, which are smeared with mastic. Vertical waterproofing is carried out by coating and pasting with rolled insulating materials. Depending on the size of the waterproofing budget, the foundation can be additionally treated with penetrating waterproofing, which will provide reliable protection against water penetration into the smallest pores and capillaries.
At the level of groundwater, which are located above the base of the foundation, it is necessary to provide for the laying of a high-quality drainage system around the entire house. Also, this event is held if the area where the house is built is subject to very frequent and heavy rainfall.
The cost of waterproofing works directly depends on the following factors:
- the size of the area that requires waterproofing;
- type of insulating materials and their quantity.
The easiest way to isolate involves the purchase of bitumen. The complex process of waterproofing a foundation includes the purchase of coating, roll, and penetrating insulation materials. You will also have to spend money on installing a drainage system and building a pressure wall.

Horizontal foundation waterproofing
For waterproofing strip foundation do-it-yourself work is done in two places:
- At a level of 20 cm from the base of the cellar.
- At the junction of the base of the house with the walls.
Advice ! Horizontal waterproofing must be carried out at the initial stage of construction. Think everything over in advance.
Before you start building the foundation with your own hands, the bottom of the pit is covered with greasy clay, the layer thickness of which is about 25 cm. It is carefully leveled and rammed. A concrete screed is poured on top, with a layer of at least 6 cm. It is necessary in order to properly waterproof the foundation. Concrete must be given time to dry well and settle. Depending on weather conditions, this period can take up to two weeks.
After complete drying, the concrete base is well lubricated with bitumen mastic, on which the first layer of roofing material is laid. Another layer of concrete (up to 8 cm thick) is laid on top. It must be carefully leveled, if necessary, lay a layer of reinforcement and allow to dry well.
After the construction work on the construction of the tape-type foundation has been completed, it is necessary to carry out waterproofing again. To do this, the surface of the foundation is covered with mastic, and then roofing felt or other rolled insulating material is covered. The whole process is carried out twice. Excess rolled insulating material must be cut off. They are brought down, and then pressed with vertical waterproofing.

Foundation vertical waterproofing
To perform this method, a combination of a variety of materials for do-it-yourself foundation waterproofing is used. Of all the known combinations, you can choose one, or you can apply several at once. It all depends on the features of the construction of the structure.
Bituminous foundation waterproofing
For many years, this type of waterproofing has been the cheapest and most affordable for consumers. The technological process is based on the use of bituminous resin. Most often it can be purchased in bars.
The whole process includes several stages:
- Waste oil is poured into a large pot or vat (one third of the volume) and bituminous resin in the rest.
- The container is warmed up. To do this, you can use a gas stove or dilute a fire flame under the pan.
- At the moment when the bitumen melts to a liquid state, it can be applied to the prepared surface. The foundation must have even walls, be cleaned of dirt and debris. The bituminous mixture is applied with a roller or a hard brush. Thus, the solution penetrates better into recesses, small cracks and pits. Lubricate finish at about 20 cm above the soil surface. Bitumen is applied in two layers, each of which must be at least 4 cm thick.

Important ! The container with the bituminous mixture must be constantly heated so that the solution does not freeze and is suitable for work.
As practice shows, bituminous impregnation allows you to create good protection against moisture. The service life of such a coating is about five years. After the expiration of this period, it begins to crack and collapse.
Modern bituminous mixtures contain polymer particles, which can somewhat extend the life of the waterproofing. Also, the market of modern materials can offer denser bituminous mixtures in their structure. They are applied with a spatula or a special sprayer.
Gluing waterproofing
The use of a roll or pasting type is possible both separately and as an additional layer of protection against moisture.
The most popular and relatively inexpensive rolled waterproofing material is roofing felt.
The technological process of roll waterproofing the foundation of a house with your own hands consists of the following steps:
- In order to firmly fix it on the surface of the foundation, high-quality processing of the walls and base with mastic paste is carried out.
- Pieces of roofing material are heated and tightly pressed against a vertical surface with an overlap. This method is also called fusing.
- Ruberoid can be attached to the surface using special mastic pastes, which coat the surface.

Important ! Before starting the fusing procedure, the horizontal waterproofing should be carefully wrapped down and pressed well, covering the top with rolled material.
Also, in addition to roofing material, several more types of rolled waterproofing are known. These include: technonikol, stekloizol, rubitex, technoelast. They are based on a special polymeric material - polyester, which significantly increases the elasticity of the waterproofing, its resistance to external negative phenomena and improves the performance. Such materials are somewhat more expensive than roofing material, but their cost is more than compensated by the high quality of waterproofing.
It should be noted that this type of roll materials is the most the best option for independent waterproofing of the foundation of a bath or sauna.
Waterproofing with liquid rubber
This method of waterproofing is characterized by high adhesion to the base, long service life and absolute incombustibility. It is also worth noting that the resulting surface has no seams, as is observed in the case of using rolled materials. This provides the best quality moisture protection.
For those who wish to carry out waterproofing with their own hands, in this case it is better to choose one-component liquid rubber of the Elastopaz brand. Its consumption is very economical, only 3 kg per 1 m². The material is applied in layers, the number of which should be at least two. The treated surface should dry for at least 24 hours at an average air temperature of +20°C.
You can buy liquid rubber of this brand in buckets of 20 kg. This is very convenient, because if the material is not completely used up, it is enough to close the lid of the container tightly, and liquid rubber will remain suitable until the next use.
In order for liquid rubber to be light on the surface evenly and a good hitch occurs, the foundation walls must first be prepared. This procedure provides for high-quality cleaning and applying a primer. Liquid rubber is applied with a roller or spatula, following the manufacturer's instructions.
Important ! Walls and bases treated with liquid rubber require additional protection. The foundation must be additionally covered with geotextiles or a pressure wall must be mounted.
Conclusion
Not everyone can carry out waterproofing at home with their own hands. In order for the work to be done efficiently, not only the availability of tools and physical strength is required. It is imperative to understand the features of each type of waterproofing, to know the nuances and sequence of work.
In order for the foundation to last for a long time, it is important not only to properly carry out waterproofing work, but also to equip the drainage system. It significantly accelerates the removal of water, which in turn saves the surface of the foundation from premature destruction.
Do-it-yourself horizontal waterproofing of a strip foundation using roofing material. We will learn how to cut and lay roofing material correctly in the next video
- the basis of the durability of the entire building as a whole, as well as the safety of the people living in it. Every self-respecting builder pays very special attention to foundation work, the so-called "zero cycle" in combination with earthworks. The foundation is not temporary or built by eye, since its reconstruction in most cases is irrational.
This underground element of architecture is constantly in an aggressive environment, periodically saturated with moisture, and therefore needs additional protection. Regardless of the material of the foundation, and the technology of its construction, a substance such as water can destroy even concrete. To avoid fatal damage, various waterproofing materials are used in today's construction practice. But how to figure out which one is the most suitable in our case? How to make the right choice of waterproofing so as not to spend extra money on materials and the work of craftsmen? And is it possible to do the waterproofing of the foundation with your own hands? 
The processes of movement of moisture in the soil, or why it is necessary to waterproof the foundation
Moisturizing the foundation can occur in various ways. Precipitation floods it from the outside, perched water and groundwater from the inside. In addition to everything, this element, due to its constant presence in the ground, does not have the opportunity to dry properly and to erode excessive accumulations of moisture. The structure of concrete, an artificial stone material, has pores through which capillary moisture under pressure can penetrate several meters upwards, rising to the very floor of the ground floor.
The disadvantages of moisture accumulation in concrete can be grouped into the following list:

Flooding of the foundation with groundwater or perched water can also lead to its subsidence, and the roll of the entire structure. Since we are talking about stone materials that have extremely low flexibility, only a few degrees of deviation from the horizon are considered acceptable.

Types of waterproofing for foundations
There are many ways to waterproof the foundation base. Purely technologically, they are all aimed at maximizing the prevention of foundation moisture.
According to the nature of the application, waterproofing is divided into the following types:

According to the types of materials, waterproofing is divided into the following varieties:

We do the waterproofing of the foundation with our own hands
Consider in practice the work on waterproofing the foundation on the example of a base under a small country house. low-rise construction is considered the most relevant and widespread, so we will make the foundation for our house in the form of a foundation slab under the basement walls with a height of 2.30m.
The list of waterproofing works is as follows:
- Filled pillow- to prevent groundwater that can rise to the level of our basement, we will make a pillow of sand or ASG, 10-15cm thick. On top of it, it is necessary to backfill with gravel in order to prevent capillary moisture from soaking into the monolithic foundation slab of the basement;

- Drainage- in the process of a seasonal rise in the water level in the soil, hydrostatic pressure is created, which one waterproofing cannot reduce. This problem is especially felt when high level groundwater, for example, when building a house in a low terrain. In this case, it is necessary to equip drainage. It is produced at the stage of completion of foundation work, before backfilling. In the ditch remaining from the pit, on the outside of the foundation, along its entire perimeter, plastic pipe with holes on its walls at the top and side. These pipes are connected at the corners into revision wells, which can be viewed if cleaning is required. This method eliminates excess accumulation of moisture near the walls of the foundation and frees it from excess water pressure;

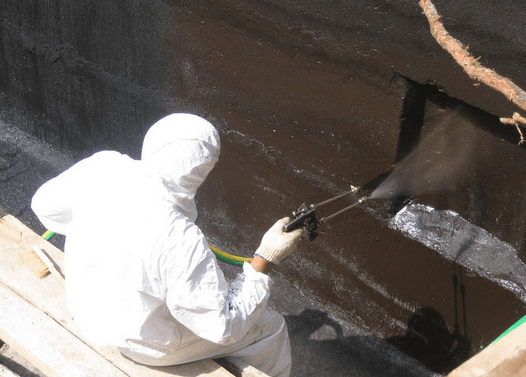
- Vertical waterproofing- the outer walls of the basement, constructed from piece materials - brick, gas - or foam blocks - must also be waterproofed. After their construction is completed, it is easiest to process them dry with bitumen-polymer mastic. This method will save you the hassle of heating with a gas burner or delivering heavy rolls to your summer cottage. All you need is a container with waterproofing, a brush or roller to apply it to the foundation walls;

- Horizontal waterproofing- is made at the place of interface of the walls of the house with the foundation or basement floor slab. This is done so that capillary moisture is completely cut off from this structural element. Another reason not to miss this type of waterproofing is to exclude the influence of rain, surface water on the foundation;

- blind area- this element is mandatory in our case. It is he who is able to protect the walls of our basement from moisture, and subsequent destruction. The blind area is poured from concrete onto a ready-made preparation of sand or ASG, if necessary, reinforcing with a metal frame. For a small thickness, a mesh of BP rod with a thickness of 3-4 mm is suitable. The width of the blind area depends on the density of the soil and the width of the roof overhang. However, it is rarely made less than 70-80cm wide. The main condition for its device is that it must have a slope of at least 4-5 degrees, for sufficient runoff of runoff and floods beyond the foundation.

A good and reliable drainage system will help to significantly improve the situation with melt and rain water, and getting it into the ground under the foundation. Gutters and downpipes are capable of collecting rainfall at a planned drain point, such as a container or well.

The base of the house, being constantly in the ground, is periodically moistened. Saturation of concrete or stone elements with moisture can lead to a loss of their strength, and subsequently to their complete destruction. And since the entire structure is located on this element, measures for waterproofing the foundation should be taken seriously. 
Waterproofing the foundation of a house is a complex undertaking. When constructing it, it is necessary to take into account the level of groundwater, and its seasonal change. Each element of the foundation must be waterproofed in time, since upon completion of earthworks, these measures will not be effective. And it’s not at all difficult to make waterproofing the foundation with your own hands, because modern materials allow even inexperienced beginners to work with them.
The video clearly shows the process of fusing rolled materials on the walls and floor of the basement. Also considered are the main and most common errors in the waterproofing of foundations, their causal relationship. This video presentation details the procedure for working with rolled polymer-bitumen waterproofing, as well as the technological nuances of its application.
Since the strength and durability of the entire structure depends on the foundation structures, its design and implementation must be approached with great care. But even a solid and properly designed foundation can collapse over time under the influence of surface and ground moisture. To protect structures from the harmful effects of water, waterproofing must be performed. Since waterproofing the foundation with your own hands must be done in accordance with all the rules, you should learn about the types of waterproofing work, the intricacies of the process and choose the right materials. In order for the process of self-performing the waterproofing of the base to go correctly, in the course of the article we offer useful videos.
Features of waterproofing
To choose the right measures to protect the base from moisture, you should consider a number of factors:
- depth of groundwater;
- the presence of soil heaving forces in winter;
- soil composition;
- structural features of the foundation and building.
The choice of the type of foundation waterproofing is primarily associated with the mark at which groundwater passes:
- If the underground aquifer is more than 1 m below the foundation cushion, then for effective isolation and protection of the base, it is sufficient to perform vertical and horizontal waterproofing by gluing two layers of roofing material onto the bituminous mastic.
- When the aquifer passes at a depth of less than 1 m from the foundation sole (provided that the water does not reach the basement level), the waterproofing package will be slightly wider. In this case, in addition to vertical and horizontal waterproofing with roofing felt, it is worth using penetrating compounds that will protect structures from capillary moisture.
- If the GWL is above the bottom of the foundation or construction is carried out in a flooded area, then in addition to the measures listed in the second paragraph, a drainage system will also have to be completed, which will effectively drain water from building structures.
Do-it-yourself horizontal insulation

- on the same level with the waterproofing layer of the basement or slightly below it (on top of the foundation cushion);
- at the junction of the foundation with the wall.
Important: since horizontal waterproofing can only be done at the construction stage, it is worth taking care of it in a timely manner.
The first layer of waterproofing is carried out after the installation of a foundation cushion in the form of a monolithic reinforced concrete tape. Quite often this layer of waterproofing is flush with the basement floor waterproofing. Work on the device is carried out as follows:
- After completing the monolithic foundation cushion, the concrete should stand for a couple of weeks.
- Then the upper surface of the foundation cushion is coated with bituminous mastic.
- The 1st layer of material is laid on it.
- After that, the surface is again covered with bituminous mastic and a second layer of roofing material.
Sometimes, to further increase the moisture resistance of concrete, it is ironed. The procedure is performed like this:
- Freshly poured concrete is allowed to brew for a couple of hours.
- Then sifted cement is poured on top of it. The height of the cement backfill is 10-20 mm. The surface is levelled.
- After some time, the cement will get wet as it absorbs moisture from the concrete.
- After that, the concrete surface is allowed to dry in the same way as a conventional concrete solution (covered with a film and periodically moistened with water).
The upper horizontal waterproofing is done after the installation of the foundation, before the laying of the walls. This process is shown in detail in the video below. The waterproofing layer will not allow capillary moisture to penetrate from the foundation structures into the walls of the house. The sequence of actions is as follows:
- The horizontal surface of the foundation structures is lubricated with bitumen.
- After that, the first layer of material is spread.
- Then we perform the coating a second time, and again roll out the roofing material.
- We do not cut the ends of the roofing material on the inside of the building, but we wind it onto the walls and connect it to the waterproofing of the floor of the first floor, if any is planned.
You can learn how to make horizontal waterproofing from the proposed video:
drainage system

If the geological conditions of the area are such that vertical and horizontal insulation alone is not enough, then a drainage system is installed along the perimeter of the building, which will collect surface and ground water and divert it from building structures to a separate well.
Instructions for arranging a drainage system around the house can be viewed in the video below. The work is done like this:
- First of all, along the perimeter of the future house at a distance of at least 70 cm, you need to dig a trench. The depth of the trench depends on the height of the passage of groundwater. The width of the ditch is 0.3-0.4 m. The bottom of the trench should have a slope towards the drainage well.
- We cover the bottom of the ditch with geotextile. We wrap the edges of the material on the walls of the trench to a height of 0.8-0.9 m.
- Then, along the entire length of the ditch, we pour a layer of gravel 5 cm high.
- You can start laying the perforated drainage pipeline. The slope of the pipes is half a centimeter per 1 linear meter.
- Now we pour out a layer of gravel 0.2-0.3 m high. The material should be pre-washed so that the drainage holes in the pipes do not clog.
- Now, on top of this layer, we lay the protruding edges of the geotextile.
- We connect the pipes to the well and fill the trench with soil.
Important: the arrangement of the drainage system does not have to be carried out during the construction of the building. It can be done a few years after the start of operation of the house, if necessary.
Varieties of vertical insulation
Do-it-yourself vertical waterproofing of the foundation can be performed using different materials and their combinations. You can use one of the methods below or apply both options at once.
bitumen insulation

The method of coating waterproofing of the base is considered the simplest and most affordable. To do this, we use bituminous resin, which we prepare from bar bitumen in the following sequence:
- Pour bitumen (70%) and mining (30%) into the container and place it for heating on gas stove or bonfire.
- When the solution acquires the consistency of liquid sour cream, you can begin to coat the vertical surface of the foundation. At the same time, during the execution of work, the container must be heated all the time so that the composition does not cool down.
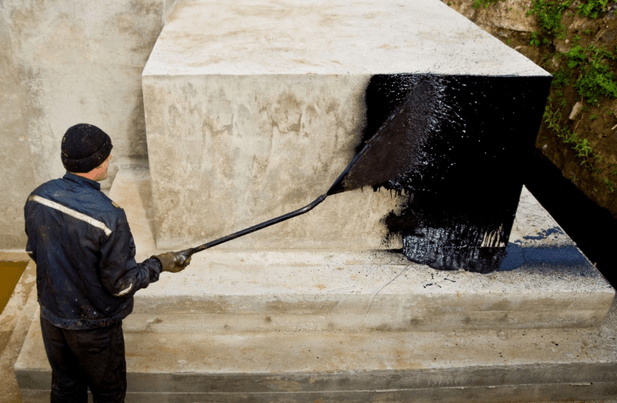
The mixture is applied to a previously leveled surface with a brush or roller. We start work from the foundation sole and finish 150-200 mm above the ground. In this case, it is necessary to apply bitumen in several layers so that the final thickness is at least 30 mm.
Such a bituminous composition can last about 5 liters. Then it will crack and crumble, letting moisture from the soil into the concrete structures. This is due to the fact that bitumen itself hardens and cracks at sub-zero temperatures.
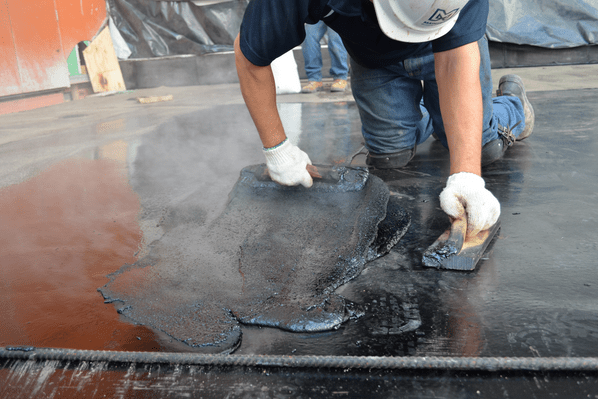
If you take bitumen-polymer mastics, then the service life of such insulation will be much longer. At the same time, there are mastics on sale that are applied cold or hot. The consistency of these mixtures also varies. Thick rigid mixtures are applied with a spatula or trowel, while liquid formulations can be sprayed or applied with a roller.
Pasting insulation

Usually rolled materials are used in combination with the coating method, but can also be used separately. Most often, roofing material is taken for these purposes. The work is done like this:
- Before gluing the roofing material to the wall, it is treated with mastic or primer, as described above.
- The strips of material are heated by a burner and attached to the vertical plane of the foundation structure. The overlap of adjacent sheets should be 150-200 mm.
Attention: before fusing the roofing material, the edges of the horizontal waterproofing are wrapped down onto a vertical surface and pressed against it. Strips of roofing material are welded on top of them.
In addition to fusing, roofing material can be attached to special mastics. After applying the mastic and gluing the first sheet, repeat the procedure.
Video guide on the implementation of vertical gluing waterproofing of the foundation:
Liquid rubber

Enough good material liquid rubber is considered to perform waterproofing. It provides excellent adhesion to the base, is quite durable and non-flammable. Thanks to the seamless surface, effective protection of building structures is ensured.
To do the work with your own hands, you can take one-component liquid rubber Elastomiks. The consumption of this product is 3.5 kg per 1 m² of surface. The sequence of actions is as follows:
- Before applying these compositions, the surface of the foundation must be dedusted and treated with a primer.
- An hour after primer treatment, you can start applying the mixture with a roller, brush or spatula.
- If backfilling of the pit will be carried out with coarse soil, then the surface covered with rubber must be protected with geotextiles or a special pressure wall.
Penetrating insulation
This type of waterproofing is done using special compounds that can penetrate the structure of concrete elements to a depth of 200 mm and crystallize inside. As a result, the structures become:
- waterproof;
- hydrophobic crystals do not allow moisture to rise through the capillaries;
- frost resistance of concrete increases;
- building elements are protected from corrosion.
Important: usually penetrating waterproofing is applied from the inside of the foundation (from the side ground floor or basement).
The composition is applied to dust-free and moistened concrete. Usually several layers are performed. If necessary, after the composition has hardened, the outer film can be removed from the surface of building structures.
Waterproofing with plaster

Special plaster compositions are often used for independent waterproofing of the foundation. Moisture-resistant substances are present in the composition of these plaster mixtures - polymer concrete, hydro concrete or asphalt mastic.
Work is carried out in the following sequence:
- After installing the beacons, the mixture is applied to the walls and leveled with a rule.
- To protect against the formation of cracks, it is advised to apply the composition in a hot way.
- When the plaster dries, it must be protected with a clay castle or by backfilling the pit with clay.
Screens

For waterproofing the base, special bentonite mats are sometimes used. This method was invented as an alternative to a clay castle, which is subject to heaving forces. Screen waterproofing can be used as an adjunct to other methods.
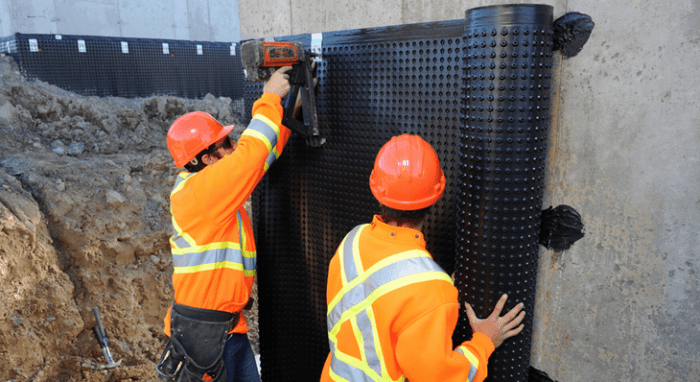
Mats are attached to the treated surface of the foundation with dowels. Sheets are laid with an overlap of 150 mm. After that, a concrete pressure wall is installed, which will not allow the bentonite mats to swell from moisture.
Important: after the destruction of the paper cover of the mats, bentonite clay is pressed into the structures and performs protective functions.
Owners of country houses try to use the area allocated for construction as efficiently as possible. This is due to the high cost of land in the suburban area, and the desire to reduce the cost of the project, since it is more profitable to build housing in several tiers than to scatter several one-story buildings that have the same useful area in total. For this reason, in most cases, a basement is made, the outer walls of which are the recessed foundation of the house, made of reinforced concrete monolith or blocks.
In order for the basement to end up with a full-fledged comfortable room with an acceptable microclimate, it should be protected from ground moisture, for which the foundation is waterproofed with your own hands. You can hire someone for these purposes, but if there is an opportunity to save a little at this stage of construction, why not. From the article you will learn what is the essence of protecting the base of the house from moisture, and how to waterproof the foundation with high quality, inexpensively, and with your own hands. To consolidate the information received, it will be proposed to watch a video on this topic.
Why is foundation waterproofing necessary?

Why do you need to protect the foundation wall from moisture. Those who build on wetlands will not understand the question. However, in many areas, groundwater is deep enough, and besides, precipitation during the year cannot be called plentiful. Is it worth it in this case to do the arrangement of hydroprotection.
It's worth it, and here's why. First, no one can reliably predict how the bed of surface ground currents may change in the near future. There is no guarantee that in a year or two, water from below will not come up in a completely dry area. What awaits the owner of the building in this option? You need to forget about the basement, or deal with waterproofing with an already functioning building. And this is very laborious and expensive, besides, we are not talking about doing it yourself.
Secondly, the climate is now very changeable. Where it rained twenty years ago, now you can’t wait for it, and vice versa. It is not worth counting on always being dry. So it is much more profitable and convenient to protect underground walls at the construction stage, so as not to return to this problem later.
What does the complex of waterproofing works include?

High-quality protection against moisture of an underground structure involves a set of technological operations aimed at waterproofing all surfaces in contact with the ground. Moreover, it is necessary to provide for hydroprotection from water coming from below, as well as from atmospheric moisture. The full range of waterproofing measures consists of the following technological stages:
- horizontal moisture insulation;
- vertical protection against excess ground moisture;
- arrangement of the drainage system;
- installation of a high-quality blind area around the perimeter of the building.
Creating a reliable horizontal hydro-barrier will protect the basement from water rising from below. Sometimes groundwater exerts significant pressure on the basement floor, so the basement floor and basement must be carefully protected.
Vertical waterproofing is applied to the outer foundation surface and is intended primarily to be a barrier to excess ground moisture, which accumulates due to precipitation. When groundwater rises above the base of the building, a vertical hydro-barrier created using standard technology will be ineffective in this situation. Drainage is required to drain water.
If construction is carried out in a region that is characterized by heavy rainfall, 50% of the success of vertical moisture protection depends on pouring a reliable blind area, which would divert sedimentary water away from the outer foundation surface. So this stage of construction should be given due attention if there is a desire to keep the walls of the basement dry. Now let's consider the most common and effective technological methods that can be applied to carry out work on each of the listed waterproofing measures.
Horizontal moisture protection
It is possible to create a horizontal waterproof cushion, which is the base of the basement floor, before pouring (installation from blocks) of the foundation, or after. It is better to do this before, since there will be no need to waterproof the base of the foundation wall. To work, you will need the following.
Materials and tools

As a hydrobarrier here, you can use a thick continuous polyethylene film, or a rolled waterproofing material, hydrostekloizol, for example. Bitumen or mastic based on it is applied as an auxiliary agent. In addition, you will need:
- concrete, or ingredients for its preparation (fine gravel, sand, portland cement);
- coarse gravel;
- river sand or fine screenings (for backfilling);
- reinforcement (6-8 mm) or strong reinforcing mesh for screed.
The tool should be prepared as follows:
- mechanical or manual tamper;
- concrete mixer;
- gas burner (if hydrostekloizol);
- welding machine or knitting wire (if fittings).
Sequence of work

As a result of the work carried out, a horizontal reinforced slab base should be obtained, with an internal moisture-proof layer, protruding about half a meter beyond the outer perimeter of the foundation. That is, the installation of the base of the building will take place on a finished slab base, protected from water from below.
- The bottom of the pit is leveled and compacted as much as possible;
- Backfilling is carried out, first with gravel (about 10 cm), then with sand (about 5 cm), after which a rough layer of concrete is poured (up to 10 cm). For greater reliability, it is possible to reinforce the draft slab base;
Important! Before pouring concrete, be sure to abundantly saturate the bedding with water. If this is not done, the moisture from the cement mortar will quickly go down, causing the strength of the concrete to become minimal. Moreover, it will be very problematic to level the solution that has lost moisture.

- After the first layer of concrete has set, it is possible to lay the film, if it is provided as a hydro-barrier. In the event that it is planned to apply bituminous mastic in order to glue the rolled material, it is necessary to wait for the concrete to dry;
- The polyethylene sheet is laid in one or two layers, after which the reinforcing frame is mounted and a finishing screed is poured over the entire area of the slab base (preferably along the lighthouses);
- Installation of rolled waterproofing is carried out as follows: apply molten bitumen or mastic on a dried base. Application is made with a stiff brush. After the material has set, hydrostekloizol is rolled out continuously (roofing material can be used). During laying, the material is heated with a gas burner or blowtorch and glued to the base. They overlap tightly, the joints warm up and are immediately pressed with a sliding motion. For this, a tool in the form of a poker is used.
Important! Installation of a horizontal moisture-proof base can be done after the construction of the foundation structure. The simply described method makes the whole range of work, which includes waterproofing the foundation with your own hands, less costly, both in the sense material costs, and in terms of the complexity of the process.
Vertical moisture protection
This type of work involves the application of a hydro-barrier layer on the outside of the foundation wall, which would protect the concrete structure from excess ground moisture. The easiest in terms of self-assembly, while it is enough effective method, is the application of rolled waterproofing materials. There are several other types of products used for similar purposes, but some of them are ineffective (hydrophobic plaster, for example), or very expensive and require knowledge of technology (how to apply), as well as special equipment for this.
In order to visually learn the rules of foundation waterproofing, it is recommended to watch the video below, where you can not only see how to apply a hydro-barrier layer, but also hear useful recommendations and a description of the nuances of work from an expert builder. Also in the video, the specialist explains the purpose of the drainage system. We will further understand how to build drainage for groundwater drainage on our own.
How to make a drainage system?
The installation of drainage communications is usually carried out by specialized teams, although, with the necessary information and a strong desire, such work during the construction phase can be done independently. Of course, you will have to hire someone to build a drainage well, but laying the system itself is not so difficult.
Tools and materials

You will need a simple toolkit, associated with earthworks (shovels, scrap, perhaps a puncher will come in handy somewhere). To determine the slope, you can use the water level. The following materials will be needed:
- large gravel or gravel;
- special perforated drainage pipe;
- pipe fittings.
Work order
The underground drainage system is equipped after the creation of the slab base and the construction of the foundation wall. First you need to determine the natural slope and in the lowest place plan a place for installing a sewer well. After work, they are performed in the following sequence:
- Dig a trench about 25-30 cm along the perimeter of the foundation (with a bayonet). The width of the recess is arbitrary, within 50-80 cm.
- The trench is covered with gravel to a level that is 10 cm below the slab base (or the base of the foundation, if horizontal waterproofing was done after the foundation of the house).
- A drainage pipe is laid in the center of the trench along the gravel bed. It is necessary to ensure that the slope from the highest point to the drainage well is constantly maintained along its course.
- After laying the pipe, another layer of large gravel is added, which will protect the drainage pipeline from the pressure of the soil layers that will be covered later.
Now, in case of approaching groundwater, they will be discharged into the constructed water intake without reaching the level of the base foot. From the drainage well, water can be pumped out at any time.
Upper waterproofing of the foundation (blind area)
The screed around the building protects the underlying foundation surface from excess moisture during heavy rains or when snow melts. An ideal option is when a clay castle is created under the blind area to the depth of the base of the building. However, clay tends to compact for a very long time, which can take 2-3 years. Therefore, now few people want to equip a clay belt.
Important! Before pouring the blind area, you should make sure that the soil covered around the base of the building is completely compacted. If this does not happen, the screed around the perimeter of the house will crack and eventually completely collapse.
How is blind area made

To create a moisture protection belt, you will need the same tools as for arranging a screed (trowel, as a rule, a plaster trowel), as well as everything you need for earthworks. Such materials will be needed.