How to work in 1 with 8.3 accounting. Accounting for trade transactions
Among the variety of software products for economic and accounting purposes presented on the domestic market today, the 1C system is one of the confident leaders. Thanks to such qualities as functional flexibility, adaptability to the requirements of domestic legislation, ease of use, and the possibility of flexible configuration taking into account the characteristics of a particular enterprise, it is winning more and more users. It is no secret that in the labor market among economists, financial service workers, accountants and managers, the most in demand are specialists who are fluent in working with the 1C program, so familiarity with it is one of the important conditions for successful professional activity.
The version of the 1C: Accounting program, the description of which we offer the reader, is the latest development of the 1C company. Despite maintaining conceptual continuity with previous versions, it is a qualitatively new product that allows you to solve a variety of problems: maintaining management and accounting records, creating analytical reporting, solving planning and financial analysis problems, using multiple charts of accounts, maintaining multi-currency accounting. The program also implements a number of other new functions that significantly facilitate the work of financial workers and meet the most stringent and current requirements of today.
Important
It is possible that in the process of studying the program the reader will discover some discrepancy between the contents of this book and what he sees on the monitor screen (after all, the 1C program is constantly being improved and refined). But in any case, these differences will not be of a fundamental nature.
In this book, we propose to complete a comprehensive training course in working with the 1C program using 100 lessons, divided into thematic chapters. As you progress through each chapter, the reader will become fully proficient in the relevant techniques and methods of working with the program. Note that the capabilities of the configuration under consideration include maintaining both accounting and tax accounting. But since, from a technical point of view, many accounting and tax accounting operations are identical or very similar, in the book we will demonstrate techniques and methods of work using the example of accounting, and where necessary, give appropriate explanations.
Chapter 1
Getting to know the program and preparing it for work
In this chapter we will look at how to launch the program, create an information base, connect the “Accounting” configuration and its preliminary configuration. All these actions are performed immediately after installing the program, since without them its operation is in principle impossible. In addition, here we will talk about the capabilities of the “Accounting” configuration under consideration, its operating modes, as well as how to quickly enter initial data using the “Start Assistant”.
Lesson #1.
General information about products of the 1C family
The 1C company has long and firmly occupied a leading position in the market for economic, financial and accounting software. Currently, the company offers a wide range of software designed to solve a wide variety of accounting and management problems.
At its core, any 1C software product is a complex use of a technology platform and one or more configurations. The technological platform is the basis on which the use of the program is based, and the configuration specifies the direction of this use. In other words, the 1C technology platform is a kind of “framework” on which one or more configurations are “strung”.
Today, 1C offers products based on two technology platforms - versions 1C 7.7 and 1C 8. "Seven" has been known for quite a long time and is probably the most widespread product in its market segment. As for the G8, its active promotion began several years ago, and currently it is also one of the most popular software tools.
The capabilities of the programs of the 1C 7.7 family include the establishment, organization and automation of accounting, personnel, operational trading, warehouse and production accounting, as well as payroll calculations. The comprehensive delivery includes a set of main components of the 1C:Enterprise system, which are “Accounting”, “Operational Accounting” and “Calculation”, as well as the main configurations:
"Accounting + Trade + Warehouse + Salaries + Personnel";
"Accounting";
"Trade + Warehouse";
"Salary + Personnel";
"Production + Services + Accounting";
"Financial planning".
The user can use integrated delivery configurations either individually (linking them through data exchange mechanisms) or together. However, you can purchase configurations separately (for example, only “Accounting” or “Trade + warehouse”).
Note that the most powerful application solution created on the basis of the 1C 7.7 technology platform is the “Accounting + Trade + Warehouse + Salary + Personnel” configuration.
However, at present, more and more users of the 1C system are choosing products implemented on the basis of the 1C 8 technology platform. Developers offer a wide range of standard solutions:
"1C: Accounting 8";
"1C: Trade Management 8";
"1C: Salaries and personnel management 8";
"1C: Integrated Automation 8";
"1C: Payment documents 8", etc.
You can find out more about standard solutions from 1C on its websites at www.1c.ru and www.v8.1c.ru. And in this book we will consider one of the most popular standard solutions created on the basis of the 1C 8 technology platform - the 1C: Accounting 8 configuration.
Lesson No. 2. Purpose and functionality of the program “1C: Accounting 8”
One of the key advantages of the configuration under consideration is the flexibility of the platform, which allows the program to be widely used in a wide variety of areas. Implemented mechanisms for accounting for cash flows, fixed assets and intangible assets, production, commercial and other types of costs, other assets and liabilities of the enterprise open up wide opportunities for management accounting and go far beyond traditional accounting standards.
The tasks solved using the 1C: Accounting 8 program can be formulated as follows:
Comprehensive automation of economic, organizational and financial activities of an enterprise;
Parallel maintenance of accounting and tax accounting;
Using the mechanism of standard operations;
Accounting for enterprise funds;
Accounting for banking and cash transactions;
Accounting for the movement of inventory items;
Accounting for settlements with counterparties;
Accounting for warehouse operations;
Production accounting;
Accounting for fixed assets and intangible assets;
Accounting for wages and settlements with personnel;
Maintaining personnel records;
Setting up, generating and printing financial statements according to forms approved by regulations of the Russian Federation;
Maintaining multi-currency accounting;
Construction of various analytical reports.
In addition to those listed, with the help of the configuration under consideration, a number of other tasks can be solved, the presence of which may be determined by the specifics of a particular enterprise.
Lesson No. 3. Running a program
After the program is installed, its program group will be created in the Start menu. The 1C Enterprise team is intended to launch the program. For ease of use, it is recommended to display the launch shortcut on the desktop using standard operating system tools.
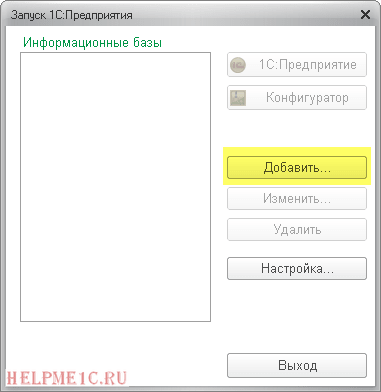
When the program starts, a window appears on the screen (Fig. 1.1).
Rice. 1.1. Starting the program
In this window, you can select the required operating mode, as well as the information base. The 1C program can function in two modes:
1C:Enterprise;
Configurator.
The required mode is selected by clicking the corresponding button in this window. We will learn more about what each mode of operation of the 1C program is when we complete the corresponding lesson.
The central part of the program launch window contains a list of infobases. When you first start the program, this list may contain an information base with a demo configuration; This base is included in the delivery package and is intended for preliminary acquaintance with the system. The information base is selected by clicking on the corresponding list position. You can add new ones to the list or edit and delete existing infobases (we’ll talk about how to do this later).
The path to the infobase directory where the cursor is installed is displayed at the bottom of the window.
The procedure for starting the program is as follows: first, you need to click on the information base in the launch window, and then click the 1C:Enterprise or Configurator button (depending on the mode in which you want to start the program).
Lesson No. 4. Operating modes of “1C:Enterprise” and “Configurator”
As we already know from the previous lesson, the 1C program can function in two main modes: 1C: Enterprise and Configurator. The required mode is selected by clicking the corresponding button in the launch window.
1C:Enterprise mode is the operating mode of the program in accordance with its purpose. In other words, it is in 1C:Enterprise mode that accountants, financiers, managers and other users of the program work.
As for the Configurator mode, it is intended for setting up and administering the program. Here configuration objects are created and edited, interfaces and dialog boxes are configured, the appearance and contents of the printed form of documents are determined, and a number of other actions are performed to set up and configure the system. In most cases, the administrator works with the Configurator, since it requires specific knowledge.
We will not consider program configuration issues, since a separate book is needed to cover this topic. Moreover, it is not recommended for the average user to make changes to the Configurator on their own (unskilled editing of it can violate the integrity of the data, and generally lead to unpredictable consequences). The only thing we will do in the Configurator mode is to connect the “Accounting” configuration to the technology platform. (see lesson № 6).
Note that some simple and accessible settings have been moved to the 1C:Enterprise operating mode. The user can edit these parameters independently (it is recommended that the system administrator be notified). We will learn how this is done when we complete the corresponding lesson.
Lesson No. 5. Working with information bases (creating, selecting, deleting)
To start using the program, when you first launch it, you need to create an information base with which you will work (all data will be stored there). To switch to the infobase creation mode, you must click the Add button in the program launch window (see Fig. 1.1). As a result, the window shown in Fig. 1 will open on the screen. 1.2.

Rice. 1.2. The first stage of adding an information base
In this window, using the switch, you need to indicate how the information base should be created. If you are just starting to work with the 1C program, and no information bases have been created until now, then you need to set the switch to the Create a new information base position in order to create a new empty database for subsequent work. The second option is intended for connecting a previously created information base.
To move to the next step, click Next.
When creating a new information base, a window will appear on the screen, which is shown in Fig. 1.3.

Rice. 1.3. Choosing a method for creating an information base
If you need to create an infobase based on an existing template (for example, based on a demo configuration), you need to set the switch to the Create infobase from template position. In this case, a list of available configurations and templates will be displayed below, where you need to select the required position with a mouse click and click Next.
If you select the second option (lower position of the switch), an information base without configuration will be created. It will be possible to subsequently connect the required configuration from the corresponding file to it (we will consider the procedure for connecting the “Accounting” configuration later).

Rice. 1.4. Entering the name and type of infobase location
In the Specify the name of the infobase field, you need to enter an arbitrary name of the database to be created using the keyboard. Under this name, the infobase will subsequently be displayed in the list of infobases in the program launch window (see Fig. 1.1).
Using the switch below, you need to indicate where the created database will be located. In most cases, this is either a computer or a local network, so by default the switch is set to On this computer or on a computer on the local network. After clicking the Next button, the window shown in Fig. 1 will open on the screen. 1.5.

Rice. 1.5. Path to the infobase directory
This window specifies the path to the directory in which the infobase files will be stored. The figure shows the default path offered by the program. To change it, click the selection button (with three dots) located at the end of this field. As a result, the Select Directory window will open, in which, according to the usual Windows rules, the required path is indicated (if necessary, you can create a new directory).
In the Language (Country) field, select the language of the created infobase from the drop-down list. By default, this field is set to Russian (Russia).
The process of creating an information base is completed by clicking the Finish button in this window.
To change the parameters of the infobase, you need to select it in the launch window (see Fig. 1.1) by clicking the mouse and clicking the Edit button, and then make the required adjustments in a step-by-step mode.
Deleting infobases is also carried out in the program launch window. To do this, select the database to be deleted by clicking the mouse and clicking the Delete button. In this case, the program will issue an additional request to confirm the deletion operation.
Remember that to operate the program you must have at least one infobase.
Lesson No. 6. Connecting the “Accounting” configuration
As we noted earlier, the 1C: Accounting 8 program consists of two key components: a technology platform and a configuration. During the installation of the program, a technological platform is installed on the computer, to which the required configuration is subsequently connected (for example, “Trade Management”, “Human Resources Management” or, as in our case, “Accounting”).
The configuration file is included in the system delivery package, has a cf extension and is connected via the Configurator.
This is done as follows.
In the program launch window (see Fig. 1.1), click on the name of the previously created infobase and click the Configurator button. As a result, the program window will open in the Configurator operating mode (Fig. 1.6).

Rice. 1.6. Program window in Configurator operating mode
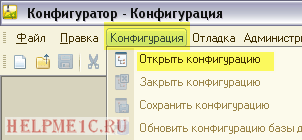
The first thing to do in this mode is to execute the main menu command Configuration | Open configuration. As a result, the Configuration window will open on the left side of the interface (Fig. 1.7).

Rice. 1.7. Opening the Configuration window
Now execute the main menu command Configuration | Load the configuration from the file (Fig. 1.8).

Rice. 1.8. Selecting the configuration load command
Please note that this command becomes available only when the Configuration window is open (see Fig. 1.7). When it is activated, the Select configuration file window shown in Fig. is displayed on the screen. 1.9.

Rice. 1.9. Selecting a configuration file
In this window you need to specify the path to the configuration file, select this file with a mouse click and click the Open button. Immediately after this, the configuration download process will begin. Information about the progress of this process will be displayed in the status bar at the bottom of the Configurator window (Fig. 1.10).

Rice. 1.10. Configuration download progress information
Please note that the process of loading a configuration from a file may take a long time, especially when working on a low-power computer.
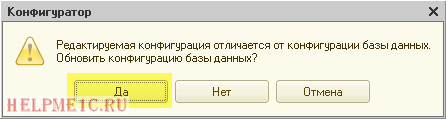
Once the download is complete, the program will prompt you to update the database configuration (Fig. 1.11).

This request should be answered in the affirmative. Information about the progress of the update process will also be displayed in the status bar. In this case, the program will issue another request to accept the configuration changes, which should also be answered positively (otherwise the update will not be completed).
After updating the database configuration, the title of the Configurator window should display the name and version of the loaded configuration. This will confirm that the configuration connection has been completed correctly.
Now you can switch to the 1C:Enterprise operating mode and start using the program.
Lesson No. 7. Description of basic user interfaces
The 1C: Accounting 8 program has its own user interface for each operating mode. Actually, there is nothing unusual about this - this approach is practiced in most Windows applications. For example, some interfaces are provided for entering data, others for selecting objects, others for viewing a list of objects, etc. In this lesson we will get acquainted with the main interfaces of 1C: Accounting 8. Any user of the program has to deal with them in the 1C:Enterprise operating mode.
After launching the program, its main window will be displayed on the screen, which is shown in Fig. 1.12.

Rice. 1.12. Main program window
It is here that the user determines his further actions by choosing the appropriate operating mode. This can be done using the main menu, toolbar, or using the function bar located in the central part of the interface.
The selection of objects for further work is carried out in the selection or list interfaces. For example, to switch to the mode of working with any directory, you need to select it in the selection window (Fig. 1.13), which is called up on the screen using the main menu command Operations | Directories.

Rice. 1.13. Sample selection interface
In this window, you need to select the required object by clicking the mouse and press the OK button or the
Also, selecting objects for viewing or editing can be done in the list interfaces. A typical example is working with documents. When you activate the corresponding command, a list window opens on the screen (Fig. 1.14), in which you select a document for further work.

Rice. 1.14. Example of a list window (receipt cash orders)
Note
At the beginning of operation of the program with a newly created empty infobase, all interfaces in the list will be empty, i.e. there will not be a single item in them.
The list window contains a list of relevant positions (documents, organizations, counterparties, etc.). For each list item, general information is shown in the corresponding columns: date and document number, counterparty for the document, amount, type of transaction, etc. (this is determined by the specific operating mode).
It is worth noting that the operating procedure in different list interfaces is largely similar. In other words, in the list window of cash orders, and in the list window of bank documents, and in the list window of documents for receipt of goods, and in many other similar operating modes, there are a number of similar, standard actions designed to perform certain operations. These actions are accessed using the corresponding commands in the Actions menu, which is opened by clicking the button in the upper left corner of the list window.
Let's take a closer look at these commands, since when operating the program, most of them have to be used constantly. Along the way, we will get acquainted with several more typical program interfaces (filter settings, data display, etc.).
Add. Using this command, you switch to the mode of forming a new position. When it is executed, an input and editing window opens on the screen. The Add command can also be activated by pressing the key
Copy. The command is intended to create a new position based on an existing one (namely, based on the one on which the cursor is placed in the list). This command is convenient to use when creating several positions of the same type, in which most of the details are the same. The Copy command is also called by pressing the key
Login to the site as a student
Log in as a student to access school materials
Internal programming language 1C 8.3 for beginner programmers: installation of 1C and your first program in 1C language
If you haven't read the introduction to the lessons, please read it: .
Installation of the educational version of 1C
To learn programming we need 1C 8.3 (not lower than 8.3.4.482).
If you have 1C version 8.3 installed, use it. If not, download and install the educational version, which 1C produces specifically for educational purposes.
Task No. 1: download and install the educational version of 1C 8.3.
Instructions to follow:
- Unpack the archive downloaded from the link into a separate folder on your desktop:
- link to download from Dropbox (option No. 1)
- download link from Mail.ru (option No. 2)
- Run the "setup.exe" file.
- Click Next, Next, Install.
- Wait for the installation to complete.
After completing Task No. 1, the following shortcut should appear on your desktop:
Congratulations! The 1C platform is installed and very soon you will be able to write your first program.
First program
This has already become a tradition for programmers - when learning a new language, the first thing they write in it is a program that prints the phrase “Hello, World!” on the screen.
We will not be an exception. But, being Russian programmers, we will force the computer to display the phrase “Hello, World!” on the screen.
Task No. 2: write a program in 1C 8.3 language that, when launched, displays the phrase “Hello, World!” on the screen.
Instructions to follow:
1. Launch the "1C:Enterprise" shortcut on your desktop.
2. A list of 1C databases has opened in front of you. As you can see, it is empty. Let's create a training base in which we will program. Click " Add".
3. Select " Creating a new information base" and click the " button Further".

4. Select " Creating an infobase without configuration..." and click the " button Further".

5. Specify " Educational" and click the " button Further".

6. Specify any empty folder as the base directory (in this case it is the “Training” folder in my documents). Click "Next".
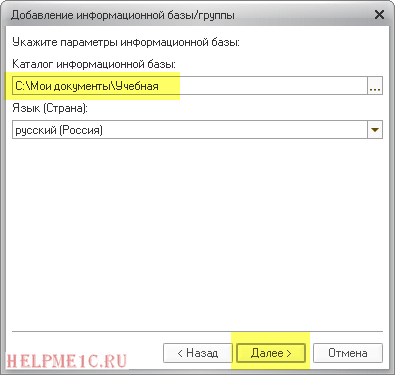
7. Specify the authentication option " Select automatically", startup mode" Fat client". Do not specify anything as the 1C:Enterprise version, click the "Finish" button.

8. As you can see, the first database that we just created ourselves has finally appeared on the list! Let's start writing code. Click " Configurator".

9. In the window that opens, select from the menu " Configuration"->"Open configuration".
10. In the panel that opens on the left, right-click on the word " Configuration" and select from the list " Open a managed application module".
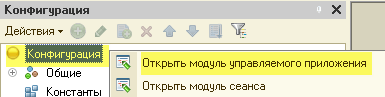
11. A window with the editor has opened. You can write text here! We will work with him in the future.

12. Now, without thinking, just copy the following text into this window:
| Report("Hello, World!"); |

13. Great! The code for our first program is ready. Let's run it. Through the menu " Debugging"->"Start debugging" (or key F5).

14. We will answer the question in the affirmative.
15. After a second or two, 1C will start and the message “Hello, World!” will appear in the window below. We got what we wanted from the computer. Congratulations on your first program!
The 1C company has released version 8.3 of the 1C:Enterprise platform. The new platform implements many functions and mechanisms that are of interest to both developers and users. We will talk about the main directions of development of the platform and new opportunities for users in this article.
Why do we need a new platform?
The dialogue between an accountant and a 1C developer is sometimes like a conversation between a deaf person and a blind person. The programmer sprinkles cryptic terms and asks frightening questions: what platform do you have? what about the configuration? Or even worse: will you work in a thin client? But the accountant is lost and doesn’t know what to answer. Therefore, before describing the advantages of the new platform, let’s understand the terminology, that is, we will find out how the configuration differs from the platform, and a thick client from a thin one.
So, configuration is the accountant's working environment. When you launch 1C:Enterprise, you find yourself in your configuration, where you enter data, perform some operations and generate reports. There are many configurations, they are created to solve various problems in accounting, trade, production, etc. The configuration can be standard - its functionality is the same for all users; or it can be adapted, that is, “added” to the needs of the client. Examples of typical configurations:
- Enterprise accounting;
- Salary and personnel management;
- Complex automation;
- Taxpayer;
- Money, etc.
In the configuration for the user's work, everything is already ready: there is a structure of the information base (directories, documents, reports, processing, registers, etc.). This structure was created to solve certain problems and an accountant cannot change it in normal work. You can change anything in the program structure, that is, adapt the configuration for a specific organization, only in the Configurator. It is in the Configurator mode that an application solution (standard or non-standard) is created.
This is the foundation on which the configuration is built. It contains a set of tools both for setting up the configuration and for its operation. Without the platform installed on the computer, neither the 1C:Enterprise mode nor the Configurator will work. The platform bears the following names: “1C:Enterprise 7.7”; “1C:Enterprise 8.0” (8.1, 8.2) and, finally, the new platform “1C:Enterprise 8.3”. A change in platform for an accountant is not visually noticeable unless the editorial configuration changes at the same time.
Client Application, in other words, client is an integral part of the platform. The client acts as an intermediary between a person (user or developer) and the program. The program, through the client, receives data from the user, processes it, and then returns it again through the client application. A person can interact with the program in different ways, according to which there are four clients:
- thick;
- thin;
- web client;
- configurator
Fat client is a client application familiar to everyone, which was used in 1C:Enterprise versions 8.0 and 8.1. The thick client has the most impressive distribution volume and must be installed on the user’s computer. The thick client allows you to implement all the capabilities of 1C:Enterprise, including setting up and modifying the program using the configurator. The thick client does not support work via the Internet.
Version 8.2. and 8.3 are focused on working with users in a thin or web client. And the thick client is mainly used by developers and administrators.
Fundamental difference thin client is that it provides work with information databases via the Internet. The thin client also requires prior installation on the user’s computer, but has a significantly smaller distribution size, that is, it takes up much less disk space than the “thick” client. This “lightness” allows you to use low-power devices, such as laptops, to work with it.
To work in web client There is no need to install the program on the user’s computer at all. Unlike thick and thin clients, it does not operate in the computer's operating system, but in the Internet browser (Internet Explorer, Mozilla Firefox, Google Chrome or Safari). Therefore, the user can log into the working 1C application from any device. To do this, just launch your browser and enter the address of the web server on which the information base is located.
Configurator. This is a client application intended for developers and administrators. With its help, you can make changes to the standard configuration. The configurator requires a thick client to run.
How to soar in the “clouds” with 1C
With the development of Internet technologies, another term came to us - "cloud". Working in the “cloud” means that a person can connect to the desired program or database remotely. In the case of 1C, this means that there is no need to download the database or even install the configuration onto the user’s computer. You can connect to your work database through any browser. This technology is fully supported by the new 1C:Enterprise 8.3 platform.
What are the benefits of working in the cloud? The first is mobility. The employee ceases to be tied to the workplace. And this is extremely important for specialists who are forced to move around due to their line of work. For example, a sales manager will be able to quickly enter data about a deal that has just been concluded right at the table in the client’s meeting room. And the chief accountant can go to the dacha and complete his reporting in the fresh air among his favorite beds.
The second advantage is savings on equipment. There is no need to spend money on building a local network, purchasing a server, or maintaining it. In addition, with this organization of work, the requirements for hardware are reduced, because there is no need to install the program on employees’ work computers. Therefore, a bulky system unit or a heavy laptop can be replaced with an ultra-thin netbook or even a tablet.
And finally, the third advantage is automatic updates. Since applications are stored in the cloud, there is no need to monitor their updates and maintain the functionality of the program - all this is done on the cloud server. At the same time, your company’s data does not hang between heaven and earth: although the technology is called “cloud”, the base of your enterprise is still stored on hardware. Only the hardware does not belong to you, but to the service provider. Therefore, all maintenance, archiving of your data, as well as its security is provided by the service provider. You don't have to think about it anymore.
You can work in the clouds through a specially developed service - the 1Cfresh.com portal. This method of operation does not require the purchase of a program or license. By connecting to the service, users see the accounting information base of their organization and work with the data from this database: adding documents, building reports, etc. In this case, the database is physically located on a server owned by 1C. Today, working through 1Cfresh is possible with several applications: “1C: Accounting 8”, “1C: Management of a small company”, “1C: Entrepreneur’s reporting”, “1C: Salary and personnel management 8”, “1C: Public institution accounting”, "1C-KAMIN: Salary". Moreover, these programs can only be used in a standard version. All that can be improved are external reports and processing.
By the way, users can always return to the previous “classic” version of work, in which working applications are installed locally, and the database is hosted on their own equipment. Moreover, you can switch from one form to another and back at any time if you wish; the procedure is included in standard solutions.
Remote connection using 1C:Link
1C-Link is another option for remote work, but you cannot call it “cloud”: with it you do not transfer your databases to someone else’s server. They remain on your hardware, but with the help of 1C technologies you get secure access to your application from anywhere in the world. This method of organizing work is suitable for small companies that do not have programmers and technicians on their staff.
You will have access to 1C information databases 24*7 from anywhere in the world where there is Internet access. All modifications and settings of 1C applications are saved. You work as you are used to, and the information databases still remain on your computer.
From an information security point of view, such a connection is reliable: 1C:Link does not store or decrypt subscriber data, and your computer remains invisible over the regular Internet. Access via 1C:Link can be configured independently, without the involvement of specialists, and access can be organized to several information bases simultaneously.
Work on mobile devices
The new platform “1C:Enterprise 8.3” is more configured to work with mobile devices than the previous one. For example, it maintains communication even with low-speed Internet. This makes it possible to work with 1C programs on a tablet or smartphone via a GPRS connection. And the web client allows you to connect to the information base using only the browser available on the device.
However, browsers running on mobile devices have a number of limitations. To bypass them, the web client was modified to take into account the specifics of the Safari mobile browser and the iPad itself. As a result, the iPad now supports touch text input, lists have side scroll bars and can be controlled with a finger, the height of rows in tables has been increased for ease of use and the width of buttons in the input field in drop-down lists, the calendar has also grown in size. Standard zoom in and zoom out gestures are supported.
In addition to a specially adapted web client for iPad, a “mobile platform” appeared as part of the 8.3 platform. This is a technology that allows developers to create applications in iOS and Android. Such mobile solutions work autonomously, but if necessary, they can synchronize their data with standard 1C solutions via the mobile Internet (via a wi-fi network or the Internet from a cellular operator). At the moment, mobile solutions are already available for the “Document Flow”, “UNF” and other configurations.
Work on different operating systems
Until recently, users of the Linux operating system could work in 1C:Enterprise 8 only through a browser using a web client. And the configurator was not available to developers and administrators in this environment at all.
With the advent of the 1C:Enterprise 8.3 platform, such restrictions no longer exist: client applications have been created for the Linux operating system, similar to those that exist for Windows, that is, “thin” and “thick” clients. In addition, the configurator has also become available on Linux. Consequently, users will be able to work with the program in any mode, and developers have the opportunity to make individual settings in the program. To organize the operation of 1C applications over the network, you can also get by with devices running on Linux.
New Taxi interface
A new interface has been created for the new version of the platform "Taxi". Its main visual difference is the large font and optimized workspace. What is optimization? Firstly, the developers hid all rarely used elements. Secondly, the user can now independently design his own desktop, placing the panels in the part of the screen he needs.
Favorites. You can now add not only data objects (documents, directory items), but also commands to your favorites. Moreover, this can be done almost anywhere in the program in “one click”: from the form, from the functions menu, from the history dialog.
Search. Now full-text search is available in all application solutions: the program has a standard search form.
Navigation. The navigation bar is now located above the workspace, rather than to the left as before. The functions necessary for convenient navigation are now implemented in several auxiliary panels: tools, favorites, history, etc.
Calendar. The appearance of the calendar has been changed, selecting the month and year has become more convenient.
"Single Window Interface". This is another feature of Taxi. In the new interface, most forms open in one main window, and the user can move back and forth through the forms open in the window by clicking on the arrow. This mode is similar to the browser.
You can compare the new and old interface using the example of a magazine Sales of goods and services in the “Enterprise Accounting” configuration (rev. 3.0) in Figures 1 and 2.

Rice. 1. Magazine Sales of goods and services in the “Taxi” interface of platform 8.3

Rice. 2. Magazine Sales of goods and services in platform 8.2 interface
Form command panel. Teams Burn, Burn and Close etc. are now made in the same style and have become more obvious (see Fig. 3).

Rice. 3. New view of the command line
Entering new elements. Adding a new item to the directory has become easier. There is now a button in the list that drops down below the input field. It allows you to create a new data element and automatically inserts a link to this element in the input field (see Fig. 4).

Rice. 4. Creating a new directory element
Story . The role of History as a data retrieval tool has increased. Now this is not a history of changes, but a history of discoveries, in which the number of saved elements has been increased.
Compatible with previous versions
Platform 8.3 supports a special compatibility mode for infobases with previous versions. This allows you to use application solutions developed on the 1C:Enterprise platform versions 8.1 and 8.2 without additional modification. Compatibility mode also allows you to migrate the platform from version 8.3 to 8.2 if necessary.
Version 8.3 of the platform is available to users of the 1C:Enterprise 8 system who have entered into a 1C:ITS agreement, as well as to partners of 1C without additional payment.
Even if you have previously studied other programming languages, for example, C++, PHP, Java, it is worth remembering that 1C, although similar in many ways, still has many fundamental differences.
The most important thing in 1C is that you don’t need to come up with your own types of objects. All of them are already in the configuration.
Install the 1C technology platform on your computer and open a new or existing database in the configurator. For starters, you can absolutely use it to teach programming.
On the left side of the window you will see a tree of configuration objects. These include documents, directories, registers, business processes and much more.
The data is also stored in the DBMS, but the developer usually does not work with it directly. Using the technology platform, the programmer accesses configuration objects or information base.
In 1C, as in many other programming languages, queries are used very often. similar to T-SQL language. Requests can be written in both English and Russian, just like the rest of the code.
Everything seems simple, but to work “in the field”, knowledge of a programming language is most often not enough. The fact is that most organizations using 1C have standard configurations installed, and you need to know them.

In terms of work for 1C programmers, there are two main branches: franchisees or working for oneself and working as a full-time programmer in the IT department of any organization. This choice depends only on your preferences.
When working for a franchisee, freelancing or running your own business, payment will be piecework. There can be a lot of work and you need to give it your all. There is no upper salary limit here, and you can earn an impressive amount of money.
If you decide to work as a freelancer or open your own business, you will not need to “share” your earnings with anyone (except for the state and the freelancing platform, of course). But in this case, you will need to look for clients yourself.
If you nevertheless decide to get a job in an organization as a full-time programmer, then you will have little dependence on the amount of work performed. In this case, there is some stability, but the salary level is also limited.
Of course, these two methods can be combined, working as a full-time programmer during the day and freelancing in the evenings.
What’s good about 1C programmers is that you may not have a technical education (for example, you are an economist, accountant, etc.). To prove your knowledge to clients or employers, you can provide your 1C certificates.
Certificates come in various types, both by platform (for programmers) and by standard solutions. You can get them at 1C by passing an exam in the form of a test or a practical task.

Books on 1C
It is best to study 1C from books that were published by 1C. So to speak, from the original source. Some of them come with standard configurations. You can also buy individual books.

The book “1C: Programming for Beginners” is intended for people who are far from programming, but want to learn how to create their own solutions on 1C 8.3 from scratch.

“Hello, 1C” shows the simplest, most basic capabilities for developing application solutions in the 1C:Enterprise 8 system.

101 Tips describes different ways to solve the same problems.

Practical guide for 1C Enterprise 8.3 developer - a very detailed guide that describes development techniques with simple and understandable examples. This book is one of the best for learning 1C programming.

This tutorial describes a query language from scratch for those who are not even familiar with SQL.

In this article we will look at step-by-step instructions for hiring an employee in 1C Accounting 8.3.
Before moving on not only to reflecting in the 1C:Accounting program the hiring of an employee, but also to other main personnel documents, you need to make some program settings.
Go to the "Administration" section and select "Accounting Settings".

In order for us to use basic personnel documents in 1C, it is enough to enable only two add-ons.

The first is located in the “General Settings” section. We will point out that accounting for payroll expenses, as well as the personnel records we need, should be kept in this program. Below, in the “Personnel Accounting” section, set the moisture level to “Full”. This add-on will give us access to basic personnel documents, including hiring employees.
Registration of hiring an employee
Creating a new employee
In the 1C: Accounting program, just like in 1C: ZUP, there are two directories: Employees and Individuals. One person can have as many employees as there are jobs at a given enterprise he has, for example, the main place of work, part-time work, a GPC agreement.
There must be only one individual. It is unacceptable to duplicate entries in this directory, since it is based on the entries in it that personal income tax is calculated to employees.

Hiring an employee
Go to the “Salaries and Personnel” section and select “Hiring”. If you do not have this item, then go back one step higher to the initial setup of the program.

In the header of the new document you create, you need to indicate the department, position and organization where you are hiring an employee. The employee you created earlier is also indicated here.
The default reception date is the current date, but we can edit this parameter. The trial period in months can be configured in the appropriate field. Next, you need to indicate the type of employment, which is selected from the drop-down list and is limited to four items.

Now all that remains is to fill out the conditions for employment. In the tabular section with accruals, you can indicate several types of accruals at once, for example, salary, bonus, etc. In our example, we set the employee only to pay the AUP salary in the amount of 30,000 rubles.

The procedure for calculating the advance is indicated below: a fixed amount or a percentage of the tariff. You can enter any text in the “Conditions of acceptance” field.
This document will come into force after we complete the movements in the relevant information registers.

See also video instructions for registering an employee as a staff member: