How to make a heart from a banknote. Origami money "double heart"
Today we will show you how to make an origami heart with your own hands from a banknote. Creating such a heart couldn’t be easier – all you need is any banknote and a little free time! A detailed master class with photos and a diagram will help you fold it out of paper correctly.
Tools and materials Time: 10 minutes Difficulty: 3/10
- paper banknote of any denomination;
- your decorative tape;
- thin marker;
- scissors.
This cute origami heart is perfect as a Valentine's card for Valentine's Day! Since it costs a whole dollar, give it only to your closest friends! And let the rest be content with candy for 25 cents. 😉
Even if you are not good at origami, it will not be difficult for you to make this heart. It's really very easy to put together! Just one or two tries - and you will remember the folding principle completely, and you will not need to look at the instructions anymore!

We think this valentine could be given in any setting - what kid wouldn't want a free banknote? If you want to make this heart for an adult audience, we also have a playful adult version. 😉

Step-by-step instructions with photos
So, below we will tell you in detail and show you how to fold an origami heart.
Step 1: Fold the Heart
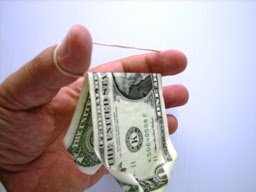
Place your dollar face up in front of you.

Fold the bill in half widthwise.

Open the fold and place the money face down. Fold both side edges towards the fold in the middle so that they match each other symmetrically.

Now turn the folded dollar face down. Fold the two bottom corners towards the middle.

Fold the top half down.

Now comes the hardest step. You need to open the top two outer corners and then “connect” them. It is very difficult to explain this in words, so we recommend looking at the photographs.

Fold the top two center corners down to complete the heart shape.

Step 2: Apply Tape
Cut a small piece of decorative tape and glue it to the back of the heart to keep the craft from folding out.

Step 3: Add a Caption
If desired, glue a strip of your ribbon to the heart. Using a thin marker, draw hearts on the ribbon and add fun messages. Don't worry - this tape is not sticky and is very easy to remove from any paper.
"Double Heart" from one bills. Master class on folding origami from money.
1 . And so we take a banknote of the denomination we need; it can be either dollars or rubles, it doesn’t matter. We bend the lower right corner up and align the fold line well.
2. Now take the upper right corner and bend it down, leveling the fold. We should get a triangle. We bend the lower left corner up and straighten the fold.
3. We bend the upper left corner down. Then we bend the right triangle to the left and iron the fold.
4. Now we bend the left triangle to the right, iron all the folds well and straighten the bill. We need these fold lines. Now look at the right side bills where our cross lines end we bend to the left and iron the fold, we should get a square. We do the same with the left side.
5. There should be two clearly visible lines in the middle. bills. Then we bend the left side of the bill to the right so that one fold falls exactly on the first line in the middle bills and our second fold was at the point of intersection of two lines in a square.
6.After we straighten the bill, we should see three equal stripes on the left side. Then on the right side we bend everything exactly the same as in step No. 5.
7. And as soon as we lay out the bill, we should see 5 equal stripes. Now fold the bill in half along the long side.
8. As soon as the bill is folded in half, take it by the upper right corner and bend it down.
9. Now hold the bill on the left side and unfold the right edge, pressing at the top on the fold line in the middle bills and press it down, the triangle should open. Smooth out the folds.
10. Now we bend the edge bills to the top and make a fold and you should get a small triangle inside.
11. Then we take and bring the edges of the bill together and bend them to the right side.
12.Now we take it again and move the edges to the side.
13. We get a triangle again, press it from the top and smooth out the folds.
14. We bend the lower right corner of the triangle up and in the same way bend the lower left corner of the triangle up. It should look like a diamond.
15. Now we bend these corners back and, having separated the triangle, press inside the middle, we get a little thing that looks like a boat.
16. We take the left corner of our boat and bend it down; on the other side we do exactly the same and we get a part that looks like a house.
17. Then we take the bottom corner (on the right side) which is in the middle of the house and bend it to the top.
18. We get a triangle again. We do the same with the left side of the house.
19. And so we again got a diamond. Take and lift the right corner to the top.
21. On the other side, we do the same thing: that is, we lift the corner of the triangle to the top and tuck all the excess under the triangle.
22. This is what our heart should look like in the end. Then we repeat everything with the left side of the bill (steps No. 8 to No. 21)
23. I won’t describe them; everything seems clear in the photo.
33. So, in the process of all these stages of folding, we should get two diamonds like this.
34. Now we turn the bill over to the other side and bend the top of the bill towards the middle.
35. We also bend the bottom side of the bill towards the middle. We have another wide piece sticking out at the top, which also needs to be bent towards the middle.
36. Then we turn our bill back and see two diamonds; near the right diamond, we bend the upper corner towards the middle. We bend the second upper corner in the same way.
37. We have two small triangles at the top; we bend the lower corners in the same way towards the middle.
38. These are the triangles we got. Then we take a small triangle, divide it in the middle and spread it apart, then press on top and it folds into a square.
39. This is how we do all the triangles - we turn them into squares. Then we bend each corner on the square towards the middle and get small diamonds, so we do this with each square.
40. Here is the most inconvenient part: each small diamond must be separated in the middle and pressed on it from the top, preferably with the tips of small scissors. We do this with all the diamonds. This is the flower you should get in the middle of the heart.
41. Then on the left side of our heart we bend the corner inward and from below we also bend the corner inward. so that the edge of our heart would not be so sharp.
42. On the right side of the heart we also fold the edges into the middle. That's it, one heart is ready. We make the second heart in exactly the same way as in step No. 35 and step No. 42.
That's it for our "Double Heart" money origami project. We got some very interesting hearts. If this is your first time folding origami out of money, it is best to practice first on plain paper larger than a banknote. After you give such a heart, you can again give it the appearance of ordinary money, just take it apart and iron it with a hot iron and everything is ready, you can go to the store.
Japanese art in all areas is distinguished by rather non-standard solutions and original execution. So the ancient oriental ability to fold all kinds of shapes out of paper has not been left aside. Today, origami made from money is especially popular. The originality of these models is truly amazing.


And the first example would be a shirt and tie.

The patterns for these origami models are very simple. To complete some models, only a diagram without a detailed description will be enough, such as with a money shirt, since the figure consists of one bill. Due to the fact that this will be your first experience in money origami, I highly recommend using money of the smallest denomination.
So, a detailed diagram for folding the original money shirt:


If you have difficulty reading the diagram, then this video master class will come to your aid:
Heart made of money
The fantasy of Japanese origamists did not end there. They came up with an original gift for the other half - a money heart. This is perhaps the most romantic way to give money to your significant other. You can take note and actively use it on Valentine's Day.

A very beautiful heart from a banknote can be made according to the following scheme:


This figure seems complex only at first glance. There are no clever tricks here. But still, for clarity, you can also watch a visual master class on video:
Flowers (roses)
After practicing on simple figures, you can safely try more complex origami models made from money: the rose pattern will require you a little more time and money, namely 3 banknotes.

In general, you can choose any flowers as a model, but, in my opinion, a bouquet of paper roses looks much more interesting:

So, for work, in addition to money, we will need a toothpick, an elastic band and a wine cork. Before work, make several notches on the cork so that we get a multi-level rose bud.

Now, using a toothpick, you need to carefully round all the edges of the bill inward - these are the future petals of the flower:

We bend the workpiece through an elastic band for money:

Then carefully wrap it around the top cut on the cork:

The result should be the following:

Follow these steps with the remaining bills:


The finished bud looks very voluminous and, in the literal sense of the word, expensive:

A rose bud can be placed on a stem from an artificial flower or a pre-prepared wire blank.
Cloth
By the way, the imagination of Japanese craftsmen really knows no bounds. You can give money to your lover or friend in the form of a dress model. Moreover, there are quite a lot of models of origami dresses, as well as real clothes in every girl’s wardrobe.

I suggest you watch one of the options for making a greeting card with an unusual money dress in the video:
Butterfly
Well, if time is really pressing, then there are simpler models that can be made in a couple of minutes. The classic origami butterfly takes on a completely different look if you make it from “expensive” paper. Judge for yourself:

As an exclusive, I found the original author's diagram of the folding of this butterfly. Don’t be confused by the fact that it is in English, because all manipulations with paper are depicted in the most visual way:


Car
A dollar car also belongs to the category of light money sculptures. A visual production diagram will not cause any difficulties, but the effect of such a gift will exceed all your expectations. Why not please your friend with an “expensive” car?

There are a lot of options for figures and methods of adding money, because the imagination of Japanese masters never ceases to amaze with its bold ideas.


Additional video lessons
Dollar Peacock:
Money is a universal gift that takes the problem of the appropriateness of the gift off the shoulders of the giver and the recipient. But there is another problem: to give them beautifully and naturally. Of course, a simple white envelope always looks quite capacious in itself, but is it always appropriate? Especially at celebrations where giving money is almost customary, like at weddings? A series of envelopes begins to tire quite quickly... Therefore, more and more often I want to make cash gifts more original, original, so that even after the money itself is spent, the memory of them as a gift will not be erased. Surprisingly, there are a lot of ideas
Money Tree
And this is by no means a Kalanchoe, but a real money tree, made with your own hands. The easiest way is to buy a ready-made interior “tree of happiness” in the store and use it as a base. Remove excess decorations from it, if necessary, and use the freed fasteners to place banknotes.

For those who are not looking for easy ways, there is another way - to independently twist the base from wire and wires. There are a lot of master classes on this topic on the Internet, but in general, the procedure is quite simple: after the wire base is twisted, it is wrapped in cloth, gauze or bandages soaked in a solution of plaster or alabaster. After the plaster has dried, you can draw “cracks” on the “trunk” with a sharp knife or a thick needle so that it looks like real bark, and paint the future tree. The entire work takes about a day, taking into account the drying time of the gypsum.
There are also many options for attaching money. You can simply connect the bills in the middle with a “bow” or remember origami and fold them with flowers, birds, leaves with your own hands - the more original the idea, the more interesting the gifts will be! And if you place rhinestones, beads, sequins, ribbons and other decorations among the bills, then the tree itself will become a wonderful interior decoration.

This is just one idea! But the base-barrel can be embroidered, knitted, sewn using applique or patchwork techniques, and the bills can be secured to the finished product, for example, with ribbons. And if you draw a tree, the recipient will also have a beautiful picture as a keepsake!
Magic - no, not a hat, - a box!
Another interesting way to give cash gifts is the so-called magic and pop-up boxes. These boxes, made using the scrapbooking technique, can be decorated not only with accessories, but also with beautifully decorated wishes for the hero of the occasion. It’s hard to imagine a more original packaging for money. “Magic” boxes open spectacularly, revealing banknotes attached to the bottom and side walls.

Pop-up boxes are reminiscent of a “bouncer in a box” toy, because when opened, the contents rise up and come out on their own. The most important thing is that the entire surface of the box plays the role of a large composite postcard, giving the recipient not only money, but also good wishes! Such gifts are never forgotten! Read a step-by-step master class on making a surprise box with your own hands here.
Bouquet of money
If a tree seems too complicated an idea, you can limit yourself to a bouquet. From money. For the simplest bouquet, it is enough to twist the banknotes into a “twist” and secure them on sticks of a suitable length. Wrap the resulting bouquet in a beautiful net, paper or fabric and tie it with ribbon.

A little more work and patience - and you will get the most beautiful bouquet of money. Banknotes can be rolled using the origami technique, or you can, with just a rubber band and toothpicks at your disposal, roll real roses with your own hands. It’s even more interesting if you make a bouquet of money using the suite design technique, i.e. Collect a flower from banknotes around a candy. The result will be not only rich in every sense, but also a delicious bouquet! Such two-in-one gifts always cause genuine delight among recipients.
Goldfish, natural resources, technological wonders and flights of fancy

Suite design is a treasure trove of ideas for giving money in any form. For example, a goldfish, made with his own hands from sweets and floral organza (mesh, corrugated paper - according to the creator’s taste), definitely has the right to promise to fulfill not just three, but as many wishes as he wants, since he swims in money “waves”. The sweet theme can be played out in another way - by making a multi-tiered cake out of banknotes. Three cardboard circles of different diameters are glued together to form a base. Each bill is rolled into a roll and attached to the base with a paper clip. The finished product is decorated with ribbons, flowers and decorative paper. If desired, you can hide any other gift inside the cake, or leave it hollow.

If you develop a fairy-tale theme, then why not make a magic pot, clearly hidden once by a cunning gnome or leprechaun, because it is full of chocolate gold and real money - both paper and metal. You can buy a real clay pot, or make it yourself from scrap materials. A “Pirate Chest” made from a box, cut out of polystyrene foam or glued together from cardboard, covered with gold and silver corrugated paper, decorated with precious stones from rhinestones and beads, full of chocolate gold coins and real bills will be a wonderful gift!
A sea shell made of straw, foil or cardboard hides inside a “pearl” folded from banknotes, a candy mill rotates with wings made of banknotes, an office briefcase made of cardboard and floral paper is tightly stuffed with money - does anyone else doubt that cash gifts can be given beautifully? !
Simple recipes
Even if it seems that there is no energy, time, opportunity or even skills for handicrafts, there are still many ways to quickly and easily turn boring money into interesting and original gifts. And the main one is packaging! 1. Bank with money. You just need to buy a beautiful jar and fill it with money beautifully folded and even tied with ribbons. Attach a bow to the lid, tie a wide ribbon around the jar itself - and a beautiful gift is ready!

2. A fun and original idea is to melt money inside a piece of homemade soap. To do this, the bill is placed in a small plastic container. Then pour the first layer of base into the soap mold and let it harden. Spray with alcohol, place the container and pour the second layer. The top layer of the base should be completely or translucent so that the surprise is visible.

3. A variation on the same theme - a bag of money - also a quick, simple and beautiful idea. You can decorate the bag in different ways (one of the fun ideas is in the photo above), and simply put the money inside. It is advisable to just fold them so that the bag is filled tighter, or you can add chocolate coins for weight and volume

4. Origami from banknotes also remains relevant. You can use banknotes to make anything you want: a camera, shoes, and even a ring. Another origami-themed idea is to combine many simple shapes, such as butterflies, into a single Hawaiian-style wreath. This surprise is suitable for both birthdays and weddings. If there are only a few bills, flowers made of paper or fabric and, of course, sweets will help to dilute the composition. A little imagination, and an unusual bright wreath is ready! You can make a heart as the central element of the wreath. How to fold a heart from 1 banknote is shown in detail in this video: In the end, even if all the original ideas seem complicated or inappropriate, there is always the option of giving money in a handmade envelope or postcard. The work and warmth of the soul invested in their creation changes the nature of the gift, despite the traditional packaging. Giving cash gifts turns out to be not so boring. A little imagination, attention to the interests of the recipient - and banknotes turn into a unique surprise.

“In a crisis, all means are good,” said one of my acquaintances, who makes her living in a profession that is quite atypical for women. They are so good that there is nothing wrong with turning to unconventional methods for help and building yourself a money talisman - “for good luck”. I’m joking, of course, but it’s really believed that such a shirt, made up of ordinary ten Russian rubles (of course, in one bill), living in a purse, financially favors its owner. In the distant Soviet times, any schoolchild could easily make such a figure, and you could often find it in the wallets of older people - who the hell is it, maybe it will really help? After all, in childhood we threw coins “for divorce”, “for sowing”?
Well, I won’t say anything about supernatural abilities, but the fact that such a manigam brings a smile to many people - friends, acquaintances, and even ordinary individuals with whom you carry out trade relations - is the most true thing. And if you are planning to give a wallet to someone, remember that giving it away empty is strictly forbidden according to the same folk superstitions. But with an intricately folded ten-ruble shirt - a nice thing!
In general, we will need about half an hour of time, a banknote of ten Russian rubles and a little diligence. There is no diagram, but there are pictures. Go:

1. Make a fold on the left side, folding in a little less than a third of the bill;

2. Fold the banknote in half along its long sides. Unfold the fold. We bend the upper and lower long edges to it;

3. Unfold the folds obtained after folding the long edges. Turn over the paper. We bend a strip half a centimeter wide from the right edge of the bill;

4. Turn the ten over and once again bend the long edges towards the middle. Once again bend the thin strip on the right side;

5. Now we’ll make cuffs for our shirt. Fully unbend the left edge of the product and bend the thin strips along the edges;

6. Re-bend the long edges of the bill towards the middle;

7. Take the left side of the banknote. We bend the inner flaps outward so that their ends protrude above the upper and lower edges of the shirt - these will be the sleeves. Now for the right edge: bend the corners forward until they intersect with the horizontal center line. This way we get a collar;

8. Bend the left edge of the paper, threading it under the collar flaps. Voila, the shirt is folded. Now she can send the shirt straight to her workplace - to any convenient compartment of her wallet, attracting bigger money. But don’t rush to quit your job expecting riches, in case the method doesn’t work
If you don't succeed the first time, don't despair and try again. Here is another instruction, this time a video. Here, however, the dollar is used, but the principle is absolutely identical:
Here are the other entries!
Tags: MoneygamiShirt

Perhaps, each of us always has one or two paper bills in our pocket, but many do not even suspect that a real work of art can be made from this “piece of paper”! This type of art is called " money origami", simply put origami from money or moneygami.
Almost anyone can make the simplest counterfeit of a banknote; you just need to apply a little patience and perseverance. In this case, you will not need scissors, glue, or anything else - just desire and a few bills. On the Internet you can easily find a large number of detailed photographs and diagrams for assembling figures. All schemes can be divided into professional and amateur. Professional counterfeiting of money, as a rule, requires a lot of time and effort and, of course, considerable experience. Using amateur schemes, even a fifth grader can easily assemble a money figure.

Interesting fact. The most popular origami craft in the world is the paper airplane.
Japanese art in all areas is distinguished by rather non-standard solutions and original execution. So the ancient oriental ability to fold all kinds of shapes out of paper has not been left aside. Today, money origami is especially popular. The originality of these models is truly amazing.


Origami from money: shirt with tie
And the first example would be a shirt and tie.

The patterns for these origami models are very simple. To complete some models, only a diagram without a detailed description will be enough, such as with a money shirt, since the figure consists of one bill. Due to the fact that this will be your first experience in money origami, I highly recommend using money of the smallest denomination.
So, a detailed diagram for folding the original money shirt:


If you have difficulty reading the diagram, then this video master class will come to your aid:
Origami heart made of money
The fantasy of Japanese origamists did not end there. They came up with an original gift for the other half - a money heart. This is perhaps the most romantic way to give money to your significant other. You can take note and actively use it on Valentine's Day.

A very beautiful heart from a banknote can be made according to the following scheme:


This figure seems complex only at first glance. There are no clever tricks here. But still, for clarity, you can also watch a visual master class on video:
Flowers (roses)
After practicing on simple figures, you can safely try more complex origami models made from money: the rose pattern will require you a little more time and money, namely 3 banknotes.

In general, you can choose any flowers as a model, but, in my opinion, a bouquet of paper roses looks much more interesting:

So, for work, in addition to money, we will need a toothpick, an elastic band and a wine cork. Before work, make several notches on the cork so that we get a multi-level rose bud.

Now, using a toothpick, you need to carefully round all the edges of the bill inward - these are the future petals of the flower:

We bend the workpiece through an elastic band for money:
Then carefully wrap it around the top cut on the cork:

The result should be the following:

Follow these steps with the remaining bills:


The finished bud looks very voluminous and, in the literal sense of the word, expensive:

A rose bud can be placed on a stem from an artificial flower or a pre-prepared wire blank.
Origami clothes made from money
By the way, the imagination of Japanese craftsmen really knows no bounds. You can give money to your lover or friend in the form of a dress model. Moreover, there are quite a lot of models of origami dresses, as well as real clothes in every girl’s wardrobe.

I suggest you watch one of the options for making a greeting card with an unusual money dress in the video:
Butterfly
Well, if time is really pressing, then there are simpler models that can be made in a couple of minutes. The classic origami butterfly takes on a completely different look if you make it from “expensive” paper. Judge for yourself:

As an exclusive, I found the original author's diagram of the folding of this butterfly. Don’t be confused by the fact that it is in English, because all manipulations with paper are depicted in the most visual way:


Car
A dollar car also belongs to the category of light money sculptures. A visual production diagram will not cause any difficulties, but the effect of such a gift will exceed all your expectations. Why not please your friend with an “expensive” car?

There are a lot of options for figures and methods of adding money, because the imagination of Japanese masters never ceases to amaze with its bold ideas.


Additional video lessons
Dollar Peacock:
Another option for giving money in an original way. In this master class we will fold origami out of money. To fold the “Heart” we will need one bill.
We will need:
Banknote of any denomination.
15 minutes of free time.
We take a banknote of any denomination, in this case it is 1000 rubles.

We lift the lower right corner up, align it with the upper edge of the bill and fold it, ironing the edge of the fold well. You should end up with a triangle.

Now take the lower left corner of the bill and fold it in the same way as the right corner. Now you have two triangles.


We do the same on the left side of our bill. We should have the same triangle on both sides.


Now we take the upper part of the bill from the sides (the one that we unfolded) and connect the two edges to the middle, and press it on top with a finger.

It itself will curl its corners inwards. We iron the folds well.

This is how you should do it.

On the other hand we do the same.

Now we fold the bill in half.

Well connecting the edges of our triangles together. Iron the fold.

Then we wrap the strip (about 1 cm) onto the triangle. We should get a clear triangle.

We bend the edges of the strip we folded so that they do not look beyond the edges of the triangle.

Now we unfold our bill to the sides.

Take one corner and bend it to the top of the triangle.

Then we take the second corner of this triangle and bend it in the same way as the first.


On the second triangle, fold one corner in the same way, then the other.

This is how we should end up with it.

Then we take one of the corners we have folded, separate it in the middle and press it from above.

It should fold and you will get a square.

We do this with each of the small triangles we have bent. As a result, you should have small squares on top of the large triangles.

Then on one of the squares we bend the corner to the middle of the square.

On the other side of the same square, we also bend the corner towards the center.

We do this with all the other squares.

Then we take a small triangle, separate it and press on top of it. We get this little triangle at the top.

This will be the petal of the flower on our heart.

We do all the other petals in the same way.


Now we turn our bill over to the other side and bend the top corner to the bottom.


We iron the fold well and bend the corners along the edges of our heart.


We turn our “heart” over to the front side again and look at what we got.

You can insert a coin or ring into the middle of the heart. Or you can leave the original version. That's all, you can donate.
